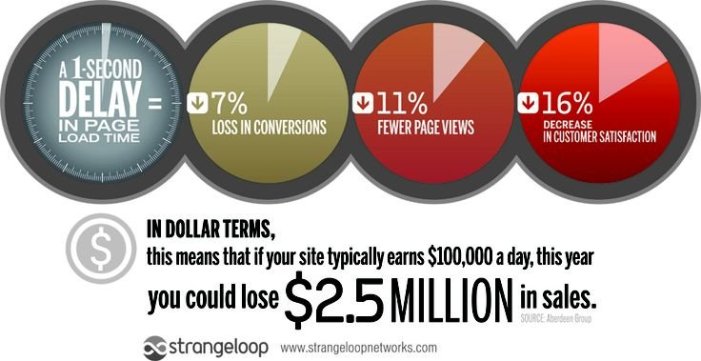
Most bloggers and website owners pay much attention to the content quality, while the topic of image optimization remains largely neglected. However, image SEO and size optimization not only allows you to bring more organic traffic to your website from image-based search engines (like Google Images), but also has a huge impact on website’s performance. If you’re not optimizing your visuals for web you slow down your page loading, and there’s nothing visitors hate more than having to wait for a website to load. A study by Strangeloop revealed that a single second delay had a crucial impact on sales, page views and customer satisfaction.
Images consume an average of 63% of website’s bandwidth. And the longer you make your visitors wait for them to load the less interested they become. While building a website, it’s recommended to properly optimize images from the start, regardless it’s WordPress or Magento development. But before we get to image optimization techniques let’s take a look at some of the most common mistakes you might have made while uploading images to your WordPress website.
Large Dimensions and Sizes
If you only need a 250×250 pixel image for your team member’s contact page, chances are you might use a 5 megapixel headshot from a camera. Naturally, high-resolution images have larger sizes and will take more time to load. If you upload them to WordPress directly without shrinking them down to the size you need, you’ll make the visitor’s browser do the same work for you. As a result, you’ll end up wasting bandwidth, your disk space, and increasing your website’s load time. To avoid this, simply resize the image, especially if you know the exact dimensions, before uploading it to your website. If you need a thumbnail that will link to a large image create two files (one thumbnail and the other of original size). Pay close attention to file size before uploading and try to keep it as low as possible. It’s best not to exceed 100K for high quality images. We’ll have more on image optimization tools later in this article.
Misuse of Image Format
Using the right format can make a big difference in terms of file size. There are four file types that dominate the web: jpeg, png, gif and ico. The last one is in most cases used only for making favicons – small (16×16 pixel) brand logos that are displayed beside URLs in a browser’s address bar. Gifs can be used for animations (e.g. simple banner ads), line art, logos or solid areas of same color. The most widespread photo formats are png and jpeg. The former is uncompressed (compression is processed without losing detail) and provides better quality for high-resolution images, but the file size is larger. Jpeg images are compressed and typically have smaller sizes. Not to get into too much detail, it’s best to stick to png for vector graphics, clip art and line art. Jpeg is good for photos and multi-colored images. If you’re still in doubt on which format to choose – just save the image in both and see the difference in size and quality. In many cases you won’t even notice slight decreases in quality while the file size will drop significantly.
Progressive JPEGs
Visually you won’t tell a progressive jpeg from a baseline jpeg. But these two load in a completely different way, which can make a difference especially if your server is not the fastest one around or you use large images on your website’s pages. Progressive jpegs preload much like interlaced gifs – going from blurry to normal as information loads.
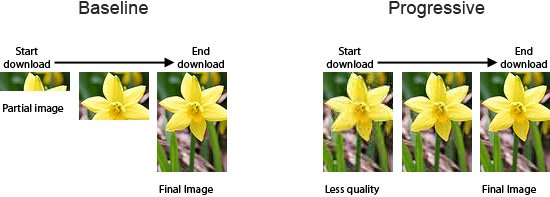
Baseline jpegs have only one layer and therefore are loaded at one go. Progressive jpeg format allows creating multiple layers which are loaded one after another, providing visitors with a lossless view. Bottom line, if you’re using jpegs it’s best to stick to progressive ones. They can be easily created in all major image editors.
Not Using a Content Delivery Network
Content delivery networks (or CDNs) allow your website to be served from POPs (points of presence, or servers) which are physically closer to the user’s location. If a CDN has servers in Paris and New York and a visitor from London requests an image from your website it will be served from a POP in Paris. As traffic volumes increase setting up a CDN can become a necessity as it will improve your website’s performance. Some popular CDNs, like CloudFlare and Incapsula, are free, others, like MaxCDN are not (prices can go up to $299 per month).
No Lazy Loading
This is an excellent resource saver. Lazy Loading is a technique that allows images to be loaded only when the visitor scrolls down to view them. If your webpage has multiple high-quality images with this technique enabled they won’t be loaded simultaneously, but will appear only when the visitor reaches their respective view-frames. This will save bandwidth and improve load times. There are several plugins that will bring lazy loading to your website, like BJ Lazy Load or WP Lazy Load.
No Image ‘Alt’ Attribute
This attribute is basically the image’s description for the search engine. It’s also the text that will be displayed to the visitor in case the image isn’t loaded for some reason. A lot of website owners tend to leave the “alt” field blank. However, this attribute is vital for image SEO and failing to fill it in might cost you a substantial amount of organic traffic. You should also try to include the most important keywords for your website in image “alt” text to improve search engine optimization. Image captions aren’t always necessary, although in some cases they can help readers understand the topic better.
Filename
Who would’ve thought that image filename can bear any significance? But from a search engine’s point of view it is important. It’s best to name your image files the same way you would title them and try to include relevant keywords if possible. It can help boost your SEO.
How to Optimize Images Manually
There are two options for image optimization: manual and automatic. If you like to have control over optimization process, do it manually. Most graphic editors, such as Adobe Photoshop are good for optimizing images for web. Adobe’s suite even comes with a feature of saving an image for web. If you prefer to use freeware there are also lots of options, including such basics as MS Paint (which is only good for resizing) or GIMP. One of the most common tools for optimizing image size without reducing its quality is JPEGmini (free trial is available, the cost is $19.99 following free trial). RIOT is another popular image optimization freeware for Windows and TinyPNG is a great online tool for png compression.
Modifying functions.php in WordPress
This option is good for those who aren’t afraid of messing with PHP. To handle image compression go to the functions.php file in your WordPress theme and add the following:
add_filter( ‘jpeg_quality’, create_function( ”, ‘return 80;’ ) );The number (80) stands for the percentage level of compression that is applied automatically to newly uploaded images. Inputting this field, however, won’t affect your previous uploads. Read this article for more details.
Automatic Image Optimization
If you don’t want to optimize images manually or mess with the code – opt for automatic optimization. Luckily, there are quite a few plugins available for that. The most popular is WP Smush.it. Not only does it automatically compress all images you upload, but it also allows bulk-optimizing existing visuals, which is a huge advantage. Another good plugin for lossy image optimization is EWWW Image Optimizer.
Other popular options include CW Image Optimizer, Imsanity and Hammy.
SEO Friendly Images is a helpful plugin that allows you to add proper “alt” and “title” attributes to your images and boost your SEO (we’ve discussed that above). Another SEO-friendly plugin is Media File Renamer. It renames the files when their titles are updated.
Hey there. You shared an amazing article. Being a digital marketer I agree with everything you said. Keep sharing goodness with your articles.
Great tips here! It’s incredible how many methods & plugins exist to help solve problems that WordPress website owners face. A great tip I personally found to speed up WordPress was removing unused Javascripts which WordPress adds to the header and the footer. This sped my site up significantly, especially removing Jquery since I wasn’t using it on my site anyway.
Very informative post. Image optimization required to reduce loading speed of site. Thanks for sharing such a great post.