Bundle product is one of the types of products available in Magento. This product type allows a customer to choose from a given range of options to create their own customized version of a product. And while a bundle product looks like a single entry in the product catalog, for the merchant this type of product is really a bundle of products, like the name itself suggests. A bundle product can consist of simple or virtual products and contain many groups of products, which the customer can configure.
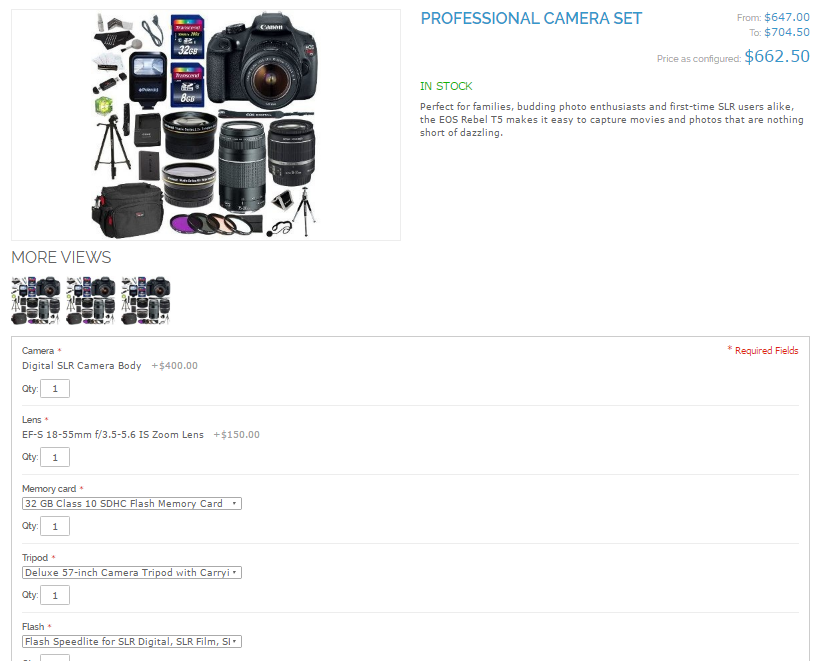
For example, you sell a professional camera. Cameras are often sold in bundles so that customers are able to select from a number of options including memory, lenses, case, tripod, filters, etc. Same goes for computers or laptops. As similar as laptops of the same series can look on the outside, the parts that they consist of may vary widely, as customers choose their computers primarily based on the processor, RAM, hard drive, and other parts that influence its overall productivity. These options are represented by groups of products from which the user can select.
Just as in the case with grouped products or configurable products, when creating a bundle product you configure most of the basic options the same way you would configure simple products.
You start with creating simple products that will serve as options of the bundle product. In the General tab you set Visibility to either of the available options: Not Visible Individually for items that are only meant to be sold with the bundle; Catalog, Search or both for items that are meant to be sold separately as well.
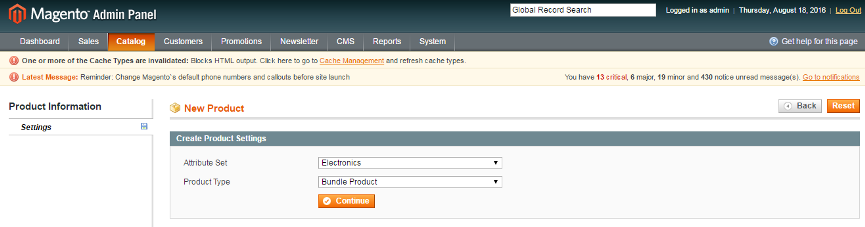
Step 1
Next you go to your Magento admin panel and open the hoverable Catalog dropdown menu in the top navigation bar and choose Manage Products option. In the page that opened click Add Product button.
Step 2
In the next page, choose the relevant set of attributes (in our example we select Electronics) from the Attribute Set drop down-menu, and from the Product Type drop-down menu select Bundle Product. And click Continue button.
Step 3
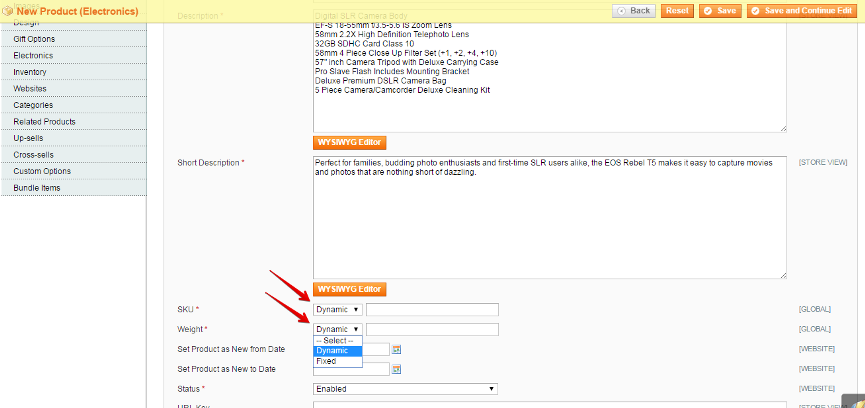
In the General tab set Status to Enabled. There are a couple options in the General tab that are configured differently for bundle products compared to simple products. Namely, the SKU and Weight options. Each of these options have a drop down menu next to them, from which you can select either Dynamic or Fixed options.
If you set SKU to Fixed, you need to put its value in the field next to it. If you set SKU option to Dynamic, you still have to type in the value in the field.
If you set Weight to Fixed, the value in the field will be applied automatically, no matter which options /simple products will be selected in the bundle on the front-end by the customer. However if you select Dynamic option from the drop-down menu, you are able to leave the field empty, and the weight will be calculated based on the weight set in the simple products within the bundle.
Step 4
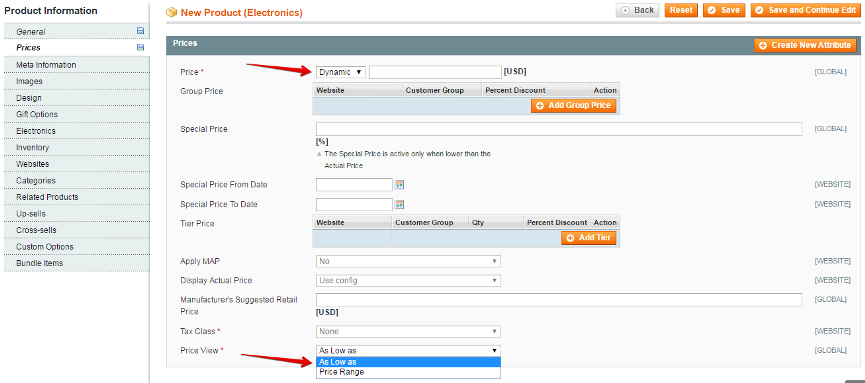
When you go to the Price tab, you will see that this option is also configured somewhat differently than that in the simple product. There is a drop-down menu with the same options: Fixed or Dynamic. You can leave the default Dynamic option, which will make the price to be calculated based on the price of the items selected by the customer on the frontend. However if the price should remain the same no matter which of the products in the bundle will be selected by the customer on the front-end, then Price drop-down menu can be set to Fixed and the value must be typed in the field next to it.
In the lower part of the Price tab there is another option that is peculiar for bundle products. I am talking about the Price View drop-down menu. It configures the way the price will appear in the catalog and in the product page on the front-end. If you have selected Price Range in the Price View drop-down menu, the range of prices (the lowest and the highest) will be displayed. If you select As Low As, the lowest price will be displayed.
Step 5
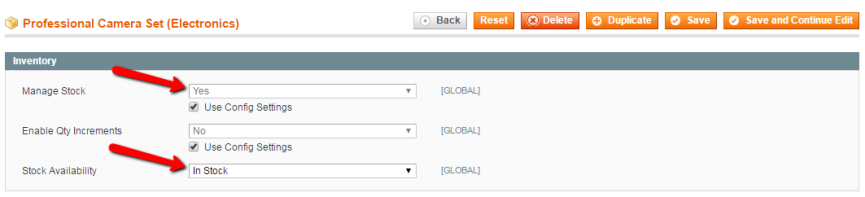
Inventory tab also looks somewhat different compared to that for simple products. You do not need to put the quantity of items you have in stock, because the inventory is handled inside each simple product within the bundle product. You choose Yes in Manage Stock drop-down menu. This setting will enable you to change the status of the product to Out of stock manually should you need to. For instance, you may need this option when you do have the product in stock but there is a delivery issue and you do not want the product to be ordered until the problem is fixed, but you still want it to be visible in the catalog so that your customers expect it to be in stock again later. Make sure the Stock Availability is set to In Stock.
Step 6
Go through other tabs in the left-side menu of the product you are creating and make the relevant settings like uploading Images of the bundle, choosing Attributes relevant to this product, setting Gift Options, setting the Categories where the product will be displayed in your web store etc.
Step 7
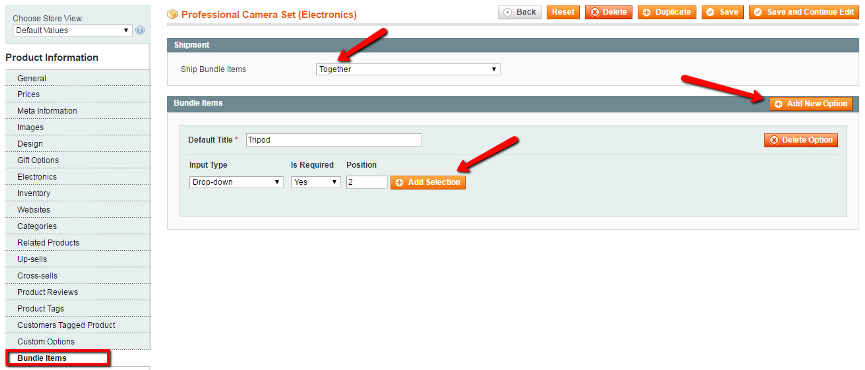
Next you go to the Bundle Items tab in the left-hand side of the screen. Here in the Shipment you can select the way items within the bundle will be shipped (Together or Separately) and to add the items that will be available within the bundle, you need to press Add New Option in the section named Bundle Items. Next you will get the fields and there you enter the name of the option in Default Title field (in our example it is Tripod, because the bundle product we are creating is Professional Camera Set) and choose what kind of selection method we want to enable for this bundle product (Drop-down, Radio buttons, Checkbox or Multiple selection in Input type drop-down menu). The Is Required drop-down menu defines whether this product is optional or compulsory within the bundle. E.g. If you want to let the customer decide whether he has to buy a cleaning kit with the professional camera set, you can choose No in Is Required drop-down menu, and the customer will be able to skip this item within the bundle product altogether. However, if you select Yes in Is Required drop-down menu, the cleaning kit will be compulsory.
The Position field is there to set the order number in which this item will be displayed in the bundle product’s page. For this Professional Camera Set we also plan to add an option of Memory card selection. If you type number 2 in this field and number 1 in the respective field of Memory card option, then on the frontend Memory card option will be displayed prior to Tripod option. Now click the Add Selection button.
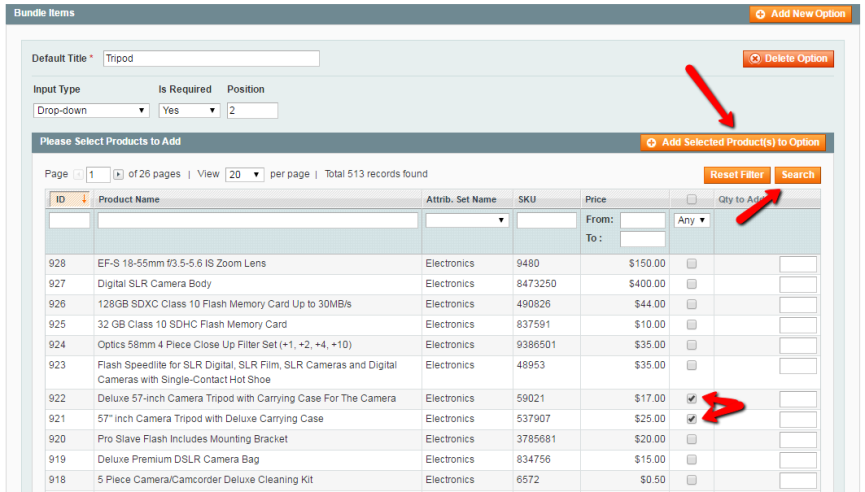
Next you get a table in which you are able to enter details of the products you are looking for among the simple products and click Search button. If you want to see the whole list of products, press Reset Filter. You mark the checkboxes for the products that you want to be included in this option and finally click Add Selected Product(s) to Option button. It is a common mistake to click Save or Save and Continue button prior to pressing Add Selected Product(s) to Option button, but this way the items you have selected will not be added to the option.
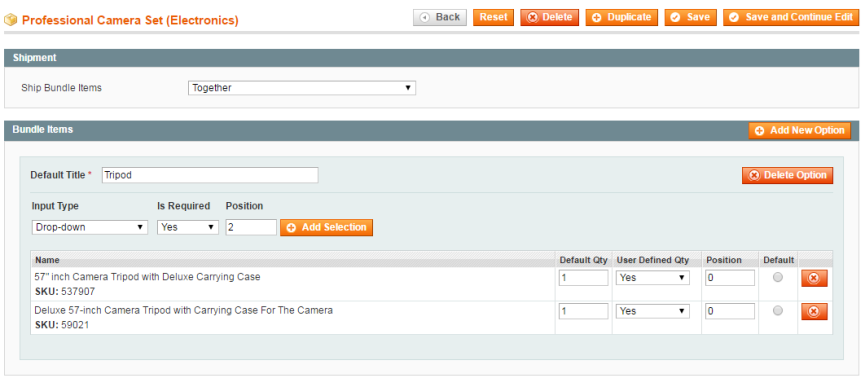
Then you get another table with the selected items in it. Here you can set the Default Qty of items that will be added to the cart by default. In the column named User Defined Qty you can either enable or prohibit the customer from changing the default quantity. Also, you set the Position of the items within the option. If you put nothing in the columns, the items within the option will be displayed in the same order as in this table by default. You can also mark the button in Default column if you want the item to be pre-selected in the drop-down menu. Finally, there is a Delete button next to each item.
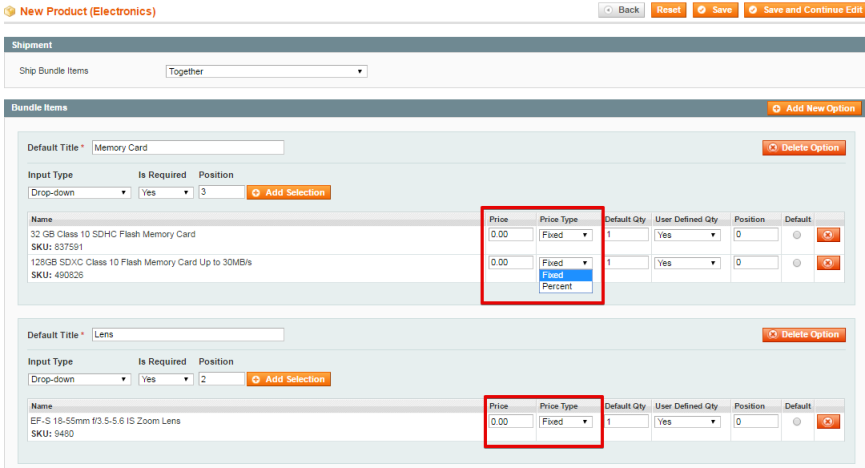
Also, if the Price of the bundle product has been set to Fixed, this table will have two more columns: Price and Price Type. The values in the Price column are all set to zero, and this way adding these items does not influence the price of the bundle. However the value can be changed so that the price of the bundle is changed accordingly. To configure whether it is a fixed amount or percentage that will be added to the fixed price of the bundle you can select Fixed or Percent in the Price Type column.
Once you have added all the items to go with the bundle and made all relevant settings, click Save and Continue button.
Repeat Step 7 for all the items within the bundle. The number of options within the bundle is not limited. Bundle product can contain both lists of items that a customer can choose from and single items that are set to be in the bundle by default. E.g. our Professional Camera Set contains a few options of Memory cards, Flash and Tripod, but there is only one model of Camera, one Lens and one set of filters etc. that will be added to the bundle regardless of other products selected by a customer within the bundle. In such cases you just add one simple product per option. Don’t forget to set the order number for all of the options, whether they contain one or a few items.
Now you can go to the frontend and refresh to see the result.
I hope this tutorial will help you configure your bundle product correctly! Maven team of developers is involved in creating numerous web stores facing complex admin issues on the daily basis. Please don’t hesitate to contact me if you have any questions or simply leave your comments below.
My brother recommended I might like this web site. He was totally right. This put up truly made my day. You can not consider just how a lot time I had spent for this info! Thanks!
Great blog! I am loving it!! Will come back again. I am bookmarking your feeds also.